How to Postgres on Kubernetes, part 2
Advantages One of the biggest advantages to using the CloudNativePG operator is that it takes many things off your hands. For example,…

Several years ago now, colleague Craig wrote a three-part blog about PostgreSQL in combination with Docker. Technology has not stood still, so an update is in order, thought Nathan Koopmans, cloud platform engineer at OptimaData. Hence, How to Postgres on Kubernetes.

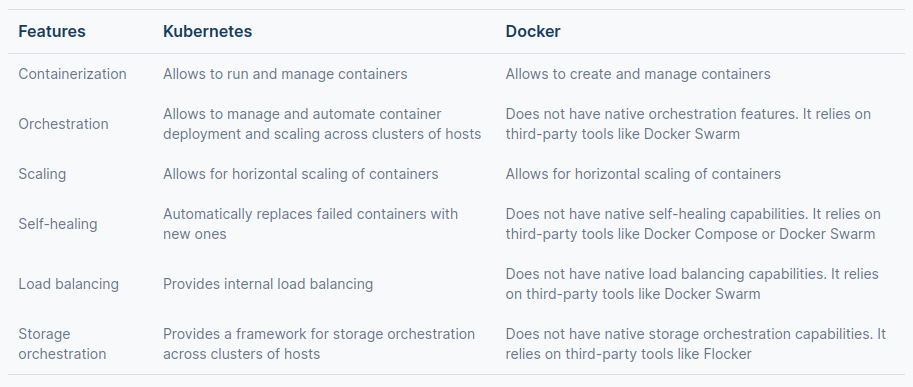
In this blog, I will assume that you already have a working Kubernetes setup. Whether this is with MiniKube, K3s, a local complete Kubernetes setup or at a cloud provider like AWS, GCP or Azure, it doesn’t matter. Personally, I use our local Kubernetes environment. Kubernetes has a few advantages over Docker, including the self-healing bit. To make the differences between Docker and Kubernetes clear, I borrowed a nice image from the Internet.
Let’s start at the beginning. Therefore, in part one I will show a setup based on a standard PostgreSQL image, in blog part two (in 2 weeks) I will use a Kubernetes database operator (CloudnativePG). But now first: Plain PostgreSQL.
First you create a YAML file to define in it some things for the PostgreSQL pod / container. What things are needed and what are they for?
A secret is a clean way to store data such as passwords. In the case of PostgreSQL, you specify a user and password to use to connect to the database. Secrets can be used for multiple pods and contain only a small amount of data. For all the ins and outs about secrets, visit the Kubernetes page on secrets.
apiVersion: v1
kind: Secret
metadata:
name: postgres-env
type: Opaque
stringData:
POSTGRES_USER: example
POSTGRES_PASSWORD: verysecret
---
A PersistentVolumeClaim is a claim on a bit of space to use. It is attached to a pod so that data can be stored here. This has the advantage that if a pod crashes, the data is not lost, but taken into a new pod. You can find more info about PVCs and all the options available on the Kubernetes-website.
apiVersion: v1
kind: PersistentVolumeClaim
metadata:
name: postgres-pv-claim
spec:
accessModes:
- ReadWriteOnce
resources:
requests:
storage: 1Gi
---
The deployment takes care of creating and managing the pods within the deployment. When you scale the deployment from one to two pods, the deployment causes the cube scheduler to create the second pod. If you modify something in the deployment, the pods will be replaced one by one with the desired modifications. In the deployment you also specify which volumes (claims) are to be used. If desired, you can also define other resources, such as CPU and RAM usage. More info can be found on the Kubernetes website.
apiVersion: apps/v1
kind: Deployment
metadata:
labels:
app: postgres
name: postgresql
spec:
replicas: 1
strategy:
type: Recreate
selector:
matchLabels:
app: postgres
template:
metadata:
labels:
app: postgres
spec:
containers:
- envFrom:
- secretRef:
name: postgres-env
image: docker.io/postgres:14
name: postgresql
ports:
- containerPort: 5432
name: postgresql
volumeMounts:
- mountPath: /var/lib/postgresql
name: postgres-data
volumes:
- name: postgres-data
persistentVolumeClaim:
claimName: postgres-pv-claim
In my case, it ends up looking like this:
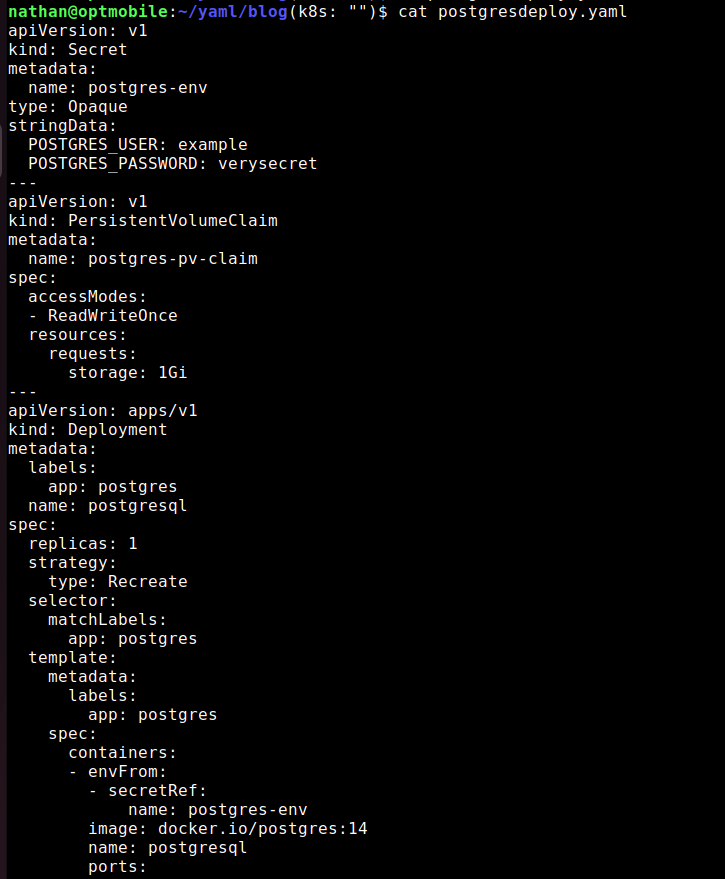
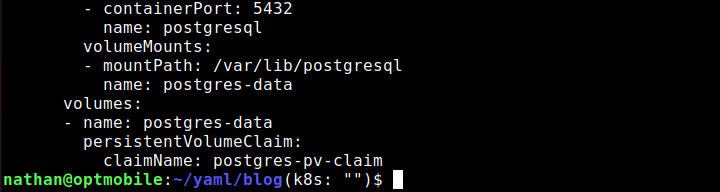
Note the “---” as I used it in the screenshot above. Don’t forget to add it!
To keep everything clean and organized, create a separate namespace where you deploy this container. Since I don’t have a separate namespace for this blog yet, I’ll create it first:
kubectl create ns postgresdeploy

The namespace has been successfully created. Now it is time to apply the YAML file so that the Secret, PersistentVolumeClaim and Deployment are created:
kubectl apply -f postgresdeploy.yaml -n postgresdeploy
 Don’t you get an error message? Then you did it right. If you do get an error message, it is usually due to a typo or indentation. YAML is very sensitive to the alignment of the various components in the file.
Give the process a few minutes to create and start everything. After that you can check if everything is created and the container is ready and has as Running status.
kubectl get all -n postgresdeploy

What is noticeable is that the PVC is missing here. This is correct because a PVC is cluster-wide. Want to check if the PVC has been created? Then run the following command:
kubectl get pvc -n postgresdeploy
![]()
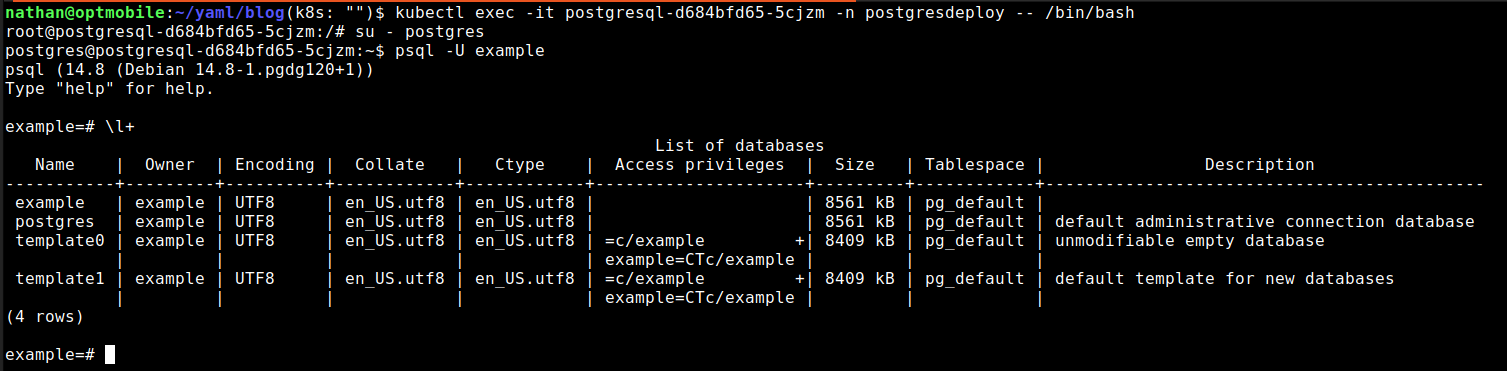
Now you are going to connect to the container:
kubectl exec -it postgresql-d684bfd65-5cjzm -n postgresdeploy -- /bin/bash
You will then get the bash prompt. Now enter:
su - postgres
This will make you become the postgres user that is active within the postgres image by default. Next, type the following:
psql -U example
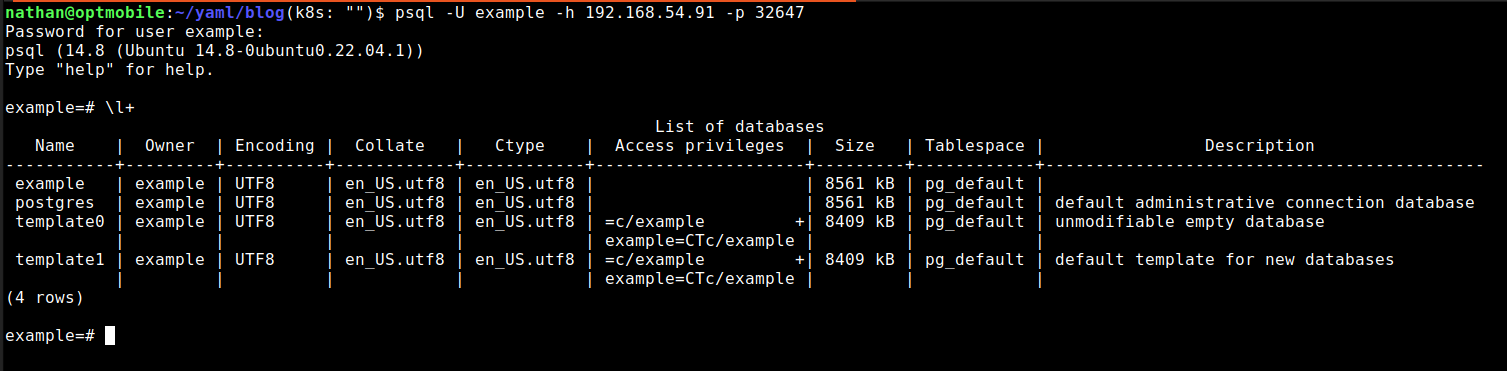
And voila, you are in postgres. There is no need to enter a password this way. Connecting externally does ask for the password. I then use \l+ to check that I am getting data back and everything is responding as it should.
Now that this works, you can make sure that PostgreSQL is also approachable without accessing the container with a bash prompt. For example, by creating a service for PostgreSQL you can easily import data from the desktop into the database.
For the service, you also create a YAML file. By working this way, you can easily apply it in another environment as well. In addition, it ensures that you can quickly set up environments after, for example, removing your cluster.
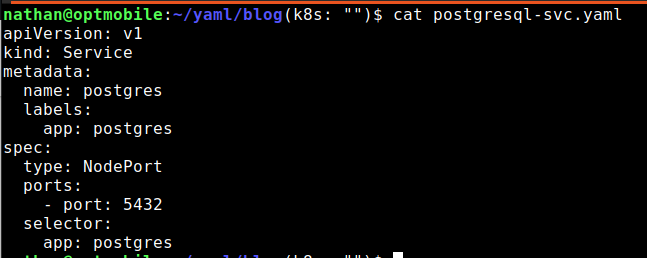
In the YAML file you place the following.
apiVersion: v1
kind: Service
metadata:
name: postgres
labels:
app: postgres
spec:
type: NodePort
ports:
- port: 5432
selector:
app:
You can find more info on the Kubernetes website.
In my case, it looks like this:
Now you can add this service in the postgresdeploy namespace using the following command:
kubectl apply -f postgresql-svc.yaml -n postgresdeploy
Next, verify that the service is actually created. Also immediately write down the ports for the next step:
kubectl get svc -n postgresdeploy

Finally, you can see if the service is working properly and if you can access PostgreSQL on the IP of the node the pod is on. In this case, you first need to know which node the pod is on and then know the IP of the node. You can do that in the following way:
kubectl get pods -o wide -n postgresdeploy
(where postgresdeploy is the namespace I used for this how-to)
kubectl get nodes -o wide
 When querying the pods with the
 -o wide option, you will see which node the pod is on. In this case on node nk-k8s- worker-1. With querying the nodes do the same thing and again use the -o wide option. This will show you the IP address of node nk-k8s-worker-1. You then use this when accessing PostgreSQL. If you look at the service you see that in this case it forwards port 5432 to port 32647. You then use this as the port for the psql command-line client on the workstation or laptop.
Psql -U example -h 192.168.54.91 -p 32647
 Result
The result is a container with PostgreSQL, which you can also access from, say, a laptop. Right now you have one replica and thus a pod. You can scale this up. However, to be really useful, you also need to set up synchronization so that data is passed from one PostgreSQL instance to another. To make life a little easier, in part two we are going to use a Kubernetes operator, which takes many things out of our hands. Of course, it is also possible with Kubernetes to make an environment without an operator highly available with streaming replication. But an operator offers so much added value that this is often preferred anyway. More on this in part two.